


Final Cut Pro Studio 7 is here
Final Cut Pro 7
After two years, solid but modest improvements
It has been more than two long years since Apple released Final Cut Pro 6 ( ), its flagship pro-level nonlinear video editing app. While there are a few extremely sexy new features in Final Cut Pro 7— among them new ProRes flavors, iChat Theater, and Easy Export that will attract lots of attention—the main focus of this new version seems to be enhancing stability, speed, and productivity.
New ProRes flavors
ProRes, a high-definition lossy video compression format developed by Apple for use in post production, was introduced in 2007 with Final Cut Pro 6 (FCP). The new variations are designed to broaden the codec family’s capabilities into higher-end post production, news markets, and offline editing. In the most compelling new feature of this release, Apple builds on the success of its excellent ProRes codec family by adding three new flavors: ProRes 4444, ProRes 422 (LT), and ProRes 422 (Proxy). ProRes 4444 is designed for highest end work or compositing with alpha channel. The LT version is for lightweight deliverables, such as broadcast, while the 422 (Proxy) is specifically for offline editing. That’s in addition to the two flavors for “normal” editing and finishing—the regular flavor for most projects, and the HQ for higher end quality, which are still included from the previous version.
ProRes 4444 For video editors like me who try to push FCP as far as it can go, there is now a ProRes codec for working with high end formats (think HDCAM SR or Redcode) or for higher quality when rendering from FCP or other programs, specifically compositing applications. ProRes 4444 supports either the traditional Y'CbCr video color space or RGB at full 4:4:4 color sampling, at up to 12 bits per pixel according to Apple. Wait, what is the fourth four for? It is for your alpha channel, and yes, Virginia, they did it right and it does have 10 bits per pixel as well. This codec runs at 330 megabits per second in a “worst-case scenario” of 1080i60 video, not including the alpha channel. The alpha is “mathematically losslessly encoded” Apple says, at a variable data rate, which hints that the codec is using some kind of compression that makes the file size smaller than an uncompressed alpha channel but of identical quality.
ProRes 422 (LT) If you know the regular ProRes 422, you like it, you use it, then think of this as ProRes 422 on a bandwidth diet. So why bother? Turns out a lot of broadcast equipment is built around 100 megabits per second pipelines—Panasonic started it with the Varicam and its DV100 (aka DVCPRO HD) codec, and continued with its AVC-Intra codec, both of which run at a maximum data rate of 100 megabits per second. So a lot of folks had their digital plumbing set up for 100 megabits per second, and regular ProRes 422, which can run up to 145 megabits per second for 1080i60 footage, could gum up the works since it was nearly 50 percent larger than the anticipated data rate. So along comes ProRes 422 (LT). It’s the same thing as ProRes (10 bit, full raster, 4:2:2 color sampling), just at a lower data rate, and it'll fit nicely into existing broadcast infrastructure. Sports and news editing for broadcast, for instance, will love this codec, since the decrease in quality will never be noticed by the time is it is compressed even further and sent out to air.
ProRes 422 (Proxy) The other ProRes codecs are fine for online editing (at final quality) for various quality expectations, but what about for offline editing? That's where ProRes 422 (Proxy) comes in. It is still full frame, 10 bit, and 4:2:2, but is much more heavily compressed. It takes the data rate all the way down to 45 megabits per second for 1080i60 video—or a touch over 5.5 megabytes per second. How small is that? That’s about 20 gigabytes per hour, or a bit less than twice the data rate of DV, if that gives you a better seat-of-the-pants sense of how tight this new codec is. But instead of DV’s Standard Definition resolution, this is 10-bit full raster 1080 resolution video at less than twice the data rate. Most impressive, but how does it look? It is clearly of inferior quality, compared with the other ProRes codecs or DVCPRO HD, but this is for offline editing, not finishing work. When editing for offline purposes, you don’t need the quality, nor storage capacity and throughput of a codec meant for finishing or online work. My non-scientific vibe after looking at some samples of ProRes (Proxy) footage is that this is the “Dish Network”-quality codec—it looks like fairly heavily compressed satellite or cable HD footage.
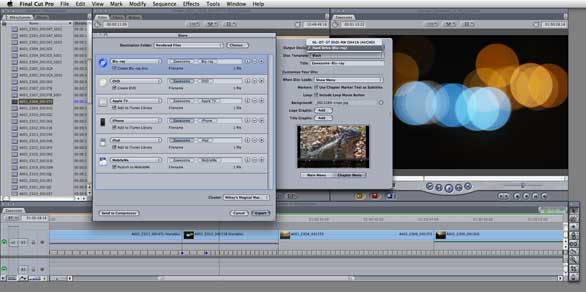
The new Easy Export function, found under File ->Share, allows exporting directly from within Final Cut Studio to a variety of formats and can also handle finishing steps—like making a DVD or Blu-ray disc (including custom graphics), publishing to MobileMe or YouTube, or sending to iTunes for syncing with Apple devices.
Easy Export
Easy Export will probably be the favorite new feature of most editors for its ease of use and time savings. Found under File->Share, it replaces Export Via Compressor. At first glance, it looks like Apple has just lifted a page from the Share interface of iMovie ’09 () , but there’s more to it than that. There are three new aspects of the Easy Export feature that significantly enhance productivity and flexibility.
• You can assign settings for target outputs such as Web, iPod, AppleTV, or DVD, directly in Final Cut Pro without having to launch Compressor, thus keeping the editor in the friendly and familiar confines of Final Cut Pro. You can assign multiple settings right from this interface, as well.
• You can assign post compression Job Actions to any of the queued targets, which are more extensive than the options you could to assign in Compressor in the past. You can, for instance, do any of the following (or more) with the click of a button: Post directly to MobileMe upon completion of compression; import into iTunes to sync to AppleTV, iPod or iPhone; publish directly to YouTube; burn a DVD or Blu-ray disc directly from this interface without going to DVD Studio Pro; or create your own post render process within Compressor, even launching Automator scripts. Then of course, you can make them available via the Share interface.
That's right—you can burn a Blu-ray disc directly from within Final Cut Pro 7. The downside is that Apple (as of this writing) still doesn't sell a Blu-ray capable SuperDrive, so you have to get a third-party drive. You can, however, burn AVCHD Blu-ray content to a standard recordable DVD disc in your SuperDrive via Share, and that will play in a Blu-ray player. DVDs and Blu-ray have a limited slate of templates to choose from, but you can at least assign custom graphics (with alpha) for background, logo, and title graphics, and even generate a chapter menu.
Another significant catch—this is the only Blu-ray support offered in the entire Final Cut Studio suite. DVD Studio Pro does not support Blu-ray in any fashion, and gets only the smallest of increments—from version 4.2.1 to 4.2.2. It does not support Blu-ray authoring, encoding, or burning. Easy Export is powerful, convenient, and useful, but that is the extent of Blu-ray support in this release. Considering that Adobe has offered Blu-ray authoring support on Intel Macs for two years, this is a startling hole in Final Cut Studio's capabilities
• All of the above can happen in the background, meaning, you can export from Final Cut Pro in the background and keep editing, even the same sequence you’re simultaneously exporting. The exported files won’t show any changes you’ve made since export started, but you can keep on working, regardless. This feature will probably be the biggest productivity boost, since you don’t have to sit and twiddle your thumbs unproductively while waiting for Final Cut to finish feeding Compressor frames, as you had to in the past. Final Cut Pro even takes advantage of Compressor clusters to accelerate the process.
iChat Theater
iChat Theater will be a boon to editors cutting remotely. OK, so you’ve used iChat’s video chat feature, right? What if you could send the live output of your edit session to someone over iChat? And wouldn’t it be nice to have a picture-in-picture of yourself over the video so you could talk to the remote client on video chat while editing? And wouldn’t it be nice to have a timecode burn-in on screen while you did it? Now you can. That is iChat Theater’s whole point—you can video chat with the client the same way you would normally with iChat, but instead of seeing the client up close, you (and they) see the live output of your edit session, either the sequence or individual clips you're working on. This has been possible in the past with an AJA Io or similar device, or with a second Mac and a DV hardware codec, but now it is possible with no additional hardware from within Final Cut Pro 7.
Of course, how well this works is entirely dependent on how fast your outbound internet connection is. From my home-office cable modem, I get 500 to 800 kilobytes per second for downloads, but at best about 125 kilobytes per second for uploading, which is what you’re doing when you send a video stream to someone. And of course, their download speed has to at least match that–they have to be able to catch as fast as you can pitch.
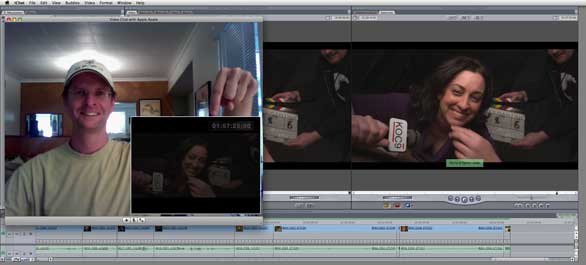
The clever new iChat Theater capability allows you to share the Canvas or Browser as a video feed for a video chat over iChat. This is the view that the editor (guy in the hat) sees. The editor (also the author) is apparently having a conversation with himself—normally the client would be visible in the background image in the editor’s iChat window.

In the same converation as above, this is the view from the client’s perspective.
New Change Speed tools
A new interface for the Change Speed window lets you set Ease In and Ease Out and has an option that lets you keep the timeline from rippling so you can doodle without pushing the rest of your timeline further down the sequence, which would mess up your audio sync. Also, a new interface element gives you keyframes in the timeline and a graphic display of how stretched your video is in time. You can either drag stretch for constant speed changes, or set keyframes for variable speed changes, right in the timeline. Unfortunately it does not take advantage of Apple’s Optical Flow technology (high quality motion and pixel blending technology from Apple’s Shake) that is present elsewhere in Final Cut Pro, Motion, and Compressor that could result in smoother frame blending. However, you can always run the clip through Motion for more accurate control and smoother results.
More fixes and features
Native AVC-Intra Support: Final Cut Pro 7 now supports native editing of this format–you can import it and edit it directly in its native file format (as it was captured), rather than having to import and wait for it to transcode to ProRes before it is editable in Final Cut Pro. Native support also includes RT Extreme acceleration for real time transitions and effects.
Alpha Transitions: Alpha transitions are scene transitions that use an animated graphic element with a matte (or alpha channel, thus the name) to do a wipe between two shots. This demos well–palm leaves brush across the screen to transition from the beach to the bungalow shot—but I’d file this in the “fluffy” category of often demoed, rarely used features outside of travel and sports shows.
New Timecode window: Previously only available as a third-party option, now you can display a resizable floating window that shows the timecode. This is ideal for that client on the couch in the back of the room.
Improved Markers: You can now color-code your clip and sequence markers, search and jump to them, and add information to them as the clip plays, and more.
Automatic Transfer: XDCAM and P2 footage now optionally copies to designated scratch directories as soon as the media is detected, and custom metadata can be added automatically via a new Log and Transfer window. Footage can start importing as soon as media is connected, which opens the door to faster, more efficient workflows as well as potentially automated workflows.
New Redcode Log and Transfer options: When importing Redcode via Log and Transfer, you can transcode to any of the ProRes flavors on import, or just import it as native. But there are no new options for cropping or scaling which I had hoped to see, nor will the 2K layer of 4K native files play back in real time in Final Cut Pro 7. Footage shot in the default 4K 16:9 will come in at a nonstandard (for video) size of 2048 by 1152, and there are no options in Final Cut to scale this to 1920 by 1080 ProRes. Similarly, if 4K footage is shot in the 2:1 aspect ratio, no provision for cropping or letterboxing to fit into 1920 by 1080 ProRes is provided by Apple. This can be done with Red provided tools, however.
This version of Final Cut Pro includes much improved closed captioning support, the ability to globally change transitions (or cherry pick the ones you want to change in bulk), improved tabs (color coding and other improvements), trackpad multi-touch gesture support for timeline navigation, and a new version of Cinema Tools for working with file-based workflows like image sequences and Redcode footage. This is a huge improvement over prior versions, but not clearly documented within Cinema Tools.
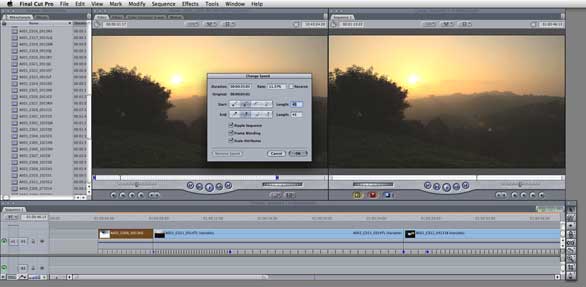
The new Change Speed interface allows for either clicking to create and then dragging keyframes directly underneath clips in the timeline, or a dialog that offers Ease In and Ease out with Ripple Sequence options—very slick!
Great job overall
The upgrades and new features in Final Cut Pro 7 are good, solid, worthwhile improvements that will increase every editor’s productivity. Final Cut Pro 7 will enable new, even higher quality workflows with ProRes 4444 for those demanding it, without requiring the massive storage and throughput that uncompressed media demands. Easy Export will save time, and iChat Theater solves the remote editing problem if everyone has sufficient bandwidth. Blu-ray support, while limited, is welcome if long overdue.
The Final Cut team has clearly listened carefully to customer requests, properly prioritized the features they did implement, and appears to have done a solid job implementing them. However, there are still a few things that haven’t been fixed from version 6, such as proper handling of pulldown and cadence in the Open Format Timeline capabilities, and a proper RGB processing pipeline that can handle more than 8 bits of precision (especially now, with ProRes 4444). Apple says the Y’CbCr 32 bit float is good enough. Red workflow still has lumps in it if you don’t shoot in the Quad HD setting. While Apple states that there will be performance benefits from running Snow Leopard with Final Cut Pro 7, no new features are enabled by running it.
If this version had shipped within a year after Final Cut Studio 2, I’d be thoroughly satisfied with Apple’s rate of progress. But it has been two years, and at this point I’m a bit surprised at how many long-standing issues haven’t been sufficiently addressed, and how relatively little bold new ground this version explores.
That said, the several days I worked with it prior to release, it did not once crash on either an 8-core Mac Pro/8-Core Xeon 2.93GHz () or a 17-inch MacBook Pro ().
Macworld’s buying advice
With Final Cut Pro 7, Apple started with an already excellent market-leading tool and takes it further with significant improvements that will benefit editors doing realistic day-to-day tasks and enable them to get better work done even faster. The background processing, Easy Export, and new ProRes flavors alone make this a worthwhile upgrade for the entirely reasonable upgrade price of $299 for the entire Final Cut Studio. The plethora of other minor improvements makes for a smoother, faster version of Final Cut Pro to work with. What’s not to love about that? I would have liked to see a few more things get fixed, and seen some dated or flawed infrastructure ripped out and rebuilt, but that is not to be for this version. As a product, this is very strong, a definite A. As an upgrade, it feels like a Macworld Expo without Steve Jobs grinning and saying, “One more thing....”